Writing multi-threaded unit tests
In my last blog post I described how I implemented the lock manager in LIFTI. This was pretty straightforward because ReaderWriterLockSlim was leveraged to do all of the really heavy lifting, but the hard part came when I wanted to unit test the code.
This post will take you through the thought and implementation process I went through to make this happen.
Test cases
The four key scenarios I wanted to test were:
- Read locks should be obtainable by multiple threads concurrently
- Read lock requests should be blocked while a write lock is active, and acquired once the write lock is released.
- Write locks should be blocked until any outstanding read locks are released
- Only one write lock should be obtainable at any one time - subsequent write lock requests should block until outstanding write locks are released.
Modelling the test cases
Looking at these tests, a few things become apparent:
- We need to have multiple threads running in a single unit test, otherwise we won’t be able to perform simultaneous lock requests.
- A unit test is actually a sequence of steps, each being an action that a given thread needs to take, e.g. acquiring a read lock, acquiring a write lock or releasing the currently held lock.
- Sometimes when a thread takes an action, it may block until a later step.
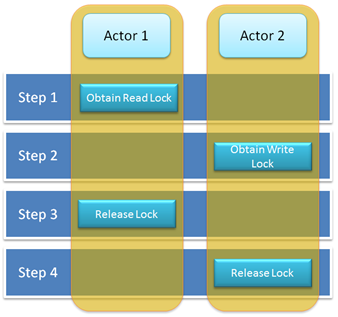
I’ve chosen to call a thread that executes actions an actor - this helps to differentiate between them and the main test thread. For each step in a sequence only one actor will have a role to play; the others will simply wait for the next step to come around.
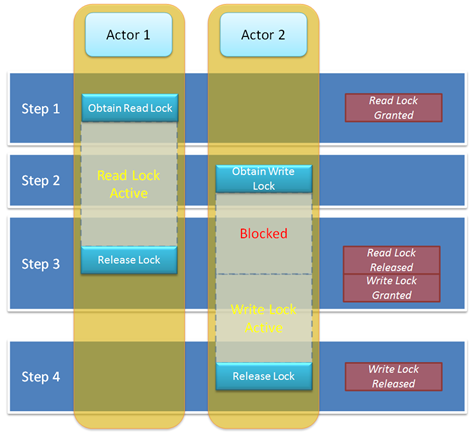
To illustrate this, lets look at what the sequence might look like for test case 3:
When this sequence is executed, locks should be obtained and released in the following order:
Due to the fact that the write lock blocks due to an active read lock, the resulting lock order is:
- Actor 1 - Acquire read lock
- Actor 1 - Release read lock
- Actor 2 - Acquire write lock
- Actor 2 - Release write lock
Anatomy of a test case
Each unit test is going to have to perform the following high-level steps:
- Define the sequence of steps that should be executed, including the actor threads that each one will be executed on.
- Spin up the required number of threads
- Execute each step in order, on the relevant thread, capturing when locks are released and acquired.
- Verify that the locks were acquired and released in the expected order.
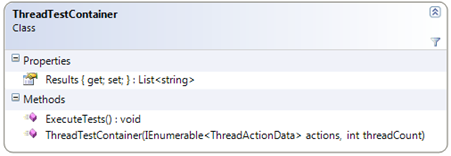
Obviously the hard part is going to be step 3 of the above. In order to help with this, I created a helper class called ThreadTestContainer to encapsulate this logic, the public interface to this being:
The constructor code is:
 1
 2public ThreadTestContainer(
 3    IEnumerable<ThreadActionData> actions,
 4    int threadCount)
 5{
 6    this.threadCount = threadCount;
 7    this.threadActions = new Queue<ThreadActionData>(actions);
 8    this.Results = new List<string>(this.threadActions.Count);
 9
10    this.lockManager = new LockManager();
11    this.lockManager.ReadLockAcquired +=
12        (s, e) => this.Results.Add(threadActorId + ": RL Acquired");
13    this.lockManager.ReadLockReleased +=
14        (s, e) => this.Results.Add(threadActorId + ": RL Released");
15    this.lockManager.WriteLockAcquired +=
16        (s, e) => this.Results.Add(threadActorId + ": WL Acquired");
17    this.lockManager.WriteLockReleased +=
18        (s, e) => this.Results.Add(threadActorId + ": WL Released");
19}
In this code we:
- Store the number of threads that will be running
- Store the actions to be executed in a queue
- Create a list of strings, into which we’ll put the results, i.e. the order locks were acquired and released.
- Create the lock manager that will be used during the test run
- Hook into the lock acquired/released events on the lock manager. Each time one of these is fired, the event and actor id is stored into into the results list. (threadActorId is set up by each thread, as you’ll see shortly.)
Hooking into the events in this way allows us to see the actual order the events took place as opposed to the order of the steps, as the events are not raised until the locks are actually acquired, even if they were blocked prior to being granted.
The work actually begins in the ExecuteTests method, but before we go into that, I need to explain how we’re going to get each of the threads (including the main test thread) to co-ordinate.
You shall not pass! (at least until all threads are ready)
I decided to make sure that all the threads met up at:
- The start of a step, signalling that they were all ready to go
- The end of a step, signalling that the ones that had nothing to do were waiting and the thread that had to do the action had completed it (forget about blocking for now)
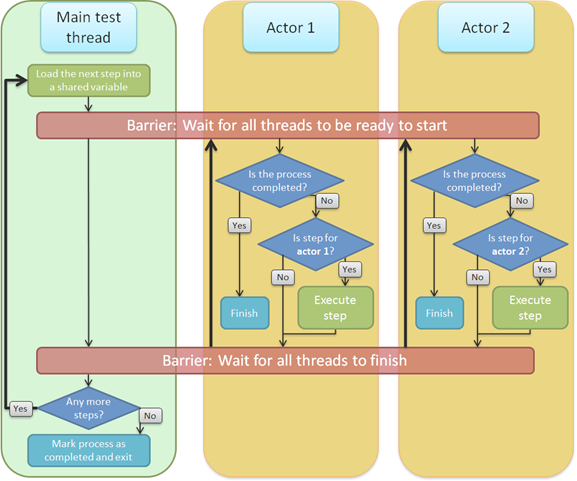
Because the number of threads involved in this synchronization is only known at runtime, I decided to make use of the Barrier class, introduced in .NET 4.0. In a nutshell this allows multiple threads to block at a line of code until a specified number of threads have done so.
The process loop that the threads will go through is best described in a diagram:
At the moment we’re making the assumption that all threads are always going to make it to the barriers, but that isn’t going to be the case. As previously mentioned, obtaining a lock at a step may block if there are other locks pending. This means that we have to be a bit smart about how many threads to wait on at the barriers for each step.
I took the decision that it’s best to leave that knowledge up to the person who defines the test, as they would be best placed to know what is expected to happen at each step.
Defining a sequence step
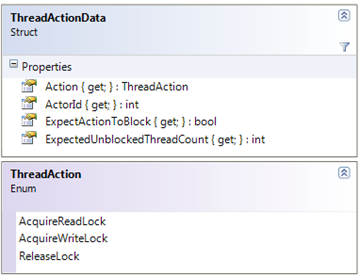
We can use a small struct to describe a step in a sequence:
- The first properties are simple, the action to take and the id of the actor to take it.
- The second describes whether the action is expected to block, in which case we’ll expect one less thread to meet up at subsequent barriers
- The third is the number of threads that are expected to become unblocked by the action. This will increase the number of threads that will meet at subsequent barriers.
ExecuteTests
Lets get into the main part of the code now. ExecutesTests is the part that starts up the threads - I’ll walk through it in chunks:
 1
 2public void ExecuteTests()
 3{
 4    var threads = (from i in Enumerable.Range(0, this.threadCount)
 5                   select new Thread(this.ThreadExecute)
 6                       {
 7                           Name = "Actor thread " + i,
 8                           IsBackground = true
 9                       }).ToArray();
10
11    this.actionStartBarrier = this.CreateActionStartBarrier();
12
13    for (var i = 0; i < threads.Length; i++)
14    {
15        threads[i].Start(i);
16    }
- The threads are created with a name (this really helps debugging - trust me!)
- The barrier that all the threads should meet at is created. For now this is just the number of threads + 1 for the main test thread.
- The threads are started up.
At this point all the threads will hit the barrier and wait - the main thread will unleash them shortly…
 1
 2    try
 3    {
 4        while (this.threadActions.Count > 0)
 5        {
 6            var action = this.threadActions.Dequeue();
 7            this.currentAction = action;
 8
 9            if (action.ExpectActionToBlock)
10            {
11                this.currentlyBlockingThreads += 1;
12            }
13
14            this.currentlyBlockingThreads -= action.ExpectedUnblockedThreadCount;
15
16            var expectedThreadsAtBarrier = this.threadCount
17                - this.currentlyBlockingThreads;
18            this.actionCompletedBarrier = new Barrier(expectedThreadsAtBarrier + 1);
- Check to see if there are any more actions to perform (i.e. is the queue empty?)
- De-queue the next action
- Update the number of blocking threads depending on the configuration in the step
- Set up the barrier that the threads should meet at once the step has completed - this is calculated as (number of threads - number of blocking threads) + 1. Again, the +1 is so that the main test thread is waited on as well.
 1
 2            if (!this.actionStartBarrier.SignalAndWait(2000))
 3            {
 4                Assert.Fail("Deadlock encountered!");
 5            }
 6
 7            if (!this.actionCompletedBarrier.SignalAndWait(2000))
 8            {
 9                Assert.Fail("Deadlock encountered!");
10            }
11
12            if (action.ExpectActionToBlock)
13            {
14                Thread.Sleep(10);
15            }
16        }
17    }
- Signal the first barrier - this is the one that all the threads should be waiting at. This will allow them to proceed with their code.
- Signal the second barrier - the main thread will (probably) hit this first and wait until the other threads get there as well.
- If the action was expected to block, the thread won’t join at the second barrier, so sleep for a very short while to give it time to perform its action. This isn’t ideal, but I can’t think of a better way at the moment… Thoughts, anyone?
- Loop back to the top of the while loop
Note that at both barriers we provide a timeout to the SignalAndWait method - this means that if the test has been configured incorrectly and not enough threads signal we can raise an exception, ending the test.
1
2    finally
3    {
4        this.completed = true;
5        this.actionStartBarrier.SignalAndWait(10);
6    }
7}
- Store the fact that we’ve completed (the threads will pick up on this)
- Signal at the first barrier again - this is where all the threads are waiting, so they need to be kicked off in order to pick up on the fact that the test has completed and they can exit.
That’s it for the ExecuteTests method - let’s break down the code for the threads.
ThreadExecute
 1
 2private void ThreadExecute(object data)
 3{
 4    threadActorId = (int)data;
 5
 6    while (true)
 7    {
 8        this.actionStartBarrier.SignalAndWait();
 9
10        if (this.completed)
11        {
12            break;
13        }
14
15        if (this.currentAction.ActorId == threadActorId)
16        {
17            this.ExecuteThreadAction(this.currentAction);
18        }
19
20        this.actionCompletedBarrier.SignalAndWait();
21    }
22}
This is fairly simple - there’s the wait call at the start and end of the loop, which repeats until the main thread sets the completed flag. The implementation of ExecuteThreadAction is even simpler, so I won’t include it here for brevity (it’s essentially just a switch statement).
Handling exceptions
One thing I haven’t covered here is handling exceptions within threads. If an exception is raised on a different thread during a unit test it can really mess with the results - you get a warning from the test, rather than an error. To top things off, you don’t get the exception details associated with the test itself.
The trick I used here is to catch the exception in the ThreadExecute method and store it in a variable. When the main thread detects that the variable is non null, it re-raises the exception on the correct thread. I haven’t included this in the previous code to avoid cluttering it up, but’ it’s pretty straightforward.
Implementing a unit test
Going back to test case 3 (write locks should be blocked until any outstanding read locks are released) and using all the previously described helper classes, we can implement the unit test like this:
 1
 2[TestMethod]
 3public void WriteLocksShouldBlockedWhileReadLockIsActive()
 4{
 5    var threadActions = new[]
 6    {
 7        new ThreadActionData(0, ThreadAction.AcquireReadLock),
 8        new ThreadActionData(1, ThreadAction.AcquireWriteLock,
 9            expectActionToBlock: true),
10        new ThreadActionData(0, ThreadAction.ReleaseLock,
11            unblockedThreadCount: 1),
12        new ThreadActionData(1, ThreadAction.ReleaseLock)
13    };
14
15    var tester = new ThreadTestContainer(threadActions, 2);
16    tester.ExecuteTests();
17
18    var expectedResults = new[]
19    {
20        "0: RL Acquired",
21        "0: RL Released",
22        "1: WL Acquired",
23        "1: WL Released"
24    };
25
26    Assert.IsTrue(tester.Results.SequenceEqual(expectedResults));
27}
Code complete
It turns out that writing an article about threading is almost, but not quite, as writing threaded code. I hope that I’ve managed to convey something on interest to you and you can take something away.
There is a potential to move some of this into a multi-threaded unit test framework of some sort, though unless I encounter a similar problem in future I’ll leave that as homework for someone else!
The full code can be found on the CodePlex site. The specific file is LockManagerTests.cs file in the unit tests project.
